









Thursday, April 30, 2009

Justina's Shrimp and Baby Spinach Salad Recipe


Hey Guys,
I came up with an idea tonight while I was making myself dinner. I finally had the house to myself tonight...sometimes dinner time with 5 other people living here can be a very crazy thing. I was lucky enough to experiment a little tonight. I have been sick the past few days, (no it's not swine flu, I assure you I am fine)....and I have been trying to eat a lot of raw vegetables in order to boost my immune system!

So as I was cooking I came up with this idea, that every time I come up with a cool recipe , I am going to blog it and tell you how I made it. This way you can try it yourself at home. It doesn't really take much effort to throw some shit in a pan and fry it up...all you need are some taste buds and a little instinct. So throw away your ramen, craft mac n cheese, cambell's and chef boyardee... Yes I do get lazy sumtimes, but fresh food is always better for you.....So here we go!

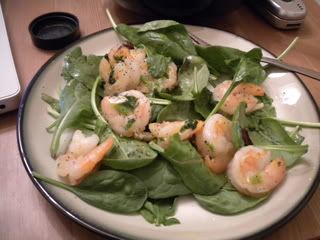
The first recipe I would like to bring to you guys is my Shrimp and Spinach Salad. Shrimp is probably my most favorite food in the world! Now I might've gotten my inspiration from Applebee's, but mine is homemade, and I added my own personal spin... and my dressing is like WAY better :-X


What you'll need:
Fresh or packaged Baby Spinach (organic is optional)
Fresh or packaged Shrimp ( i used packaged and freeze it, cuz it lasts longer)
Fresh Parsley (it is essential that this is fresh, because that is where a lot of the flavor comes from!)
Extra Virgin Olive Oil
White Cooking Wine
One small clove of Garlic
Sea Salt
Black Pepper
Lemon (Optional)

Prepping:
1. First take your shrimp ( a handful is enough for one serving), and peel the skins off if they are still on. If it's frozen, just run it under warm water.... not hot, cuz you don't want it to cook in your hand...that's kinda creepy... After they are thawed and you take the shells off, set them aside in a bowl or something. Dispose of the shells, or put them under your annoying room mate's pillow, it's completely up to you....

2. Take your fresh parsley (one sprig is enough for one serving) , and wash it if it is not already. Then grab a cutting board and a sharp knife (watch your phalanges and make sure your cheating boyfriend isn't around) and chop your parsley almost fine.

3. Get your one clove of garlic out and peel the skins off. Then chop your garlic fine as well.

4. If you are using a lemon, get that out now! Roll it on your cutting board to get the juices going (that's what she said) ...sorry I had to....
Then just cut the lemon in half, set that aside for now...

5. Take out your uncooked baby spinach(a handful or two, is enough for one serving),. You can also used baby spinach mixed with other leafy greens like mediterranean style lettuce. Wash that if you need to. Set it on a small plate, do not add dressing! You will be using the juices from the frying pan as your salad dressing.

Ok now comes the fun ! :-)

Wolfgang Puck that shit:
1. Grab a small frying pan, and set the heat to low. Coat the bottom of your pan with your extra virgin olive oil and let that heat up a bit. Once that looks like it's a -sizzlin', throw in your chopped gah-lic. Once that starts smellin amazing, you know it's time to add your main ingredients before the garlic starts to brown ( you DONT want your garlic to brown, that means it's burnt.)

2. Throw in your shrimp, and add a splash of your white cooking wine (one capful should do). Also add a pinch of seasalt, and black pepper at this point. You can also add your chopped parsley now.

3. By the time you have added the wine, salt, pepper, and parsley, the first side of the shrimp should start turning pink so you want to stir that up a bit now. Cover the pan with a lid, make sure the heat is medium to low, and let that steam a bit.

4. Get your plate of fresh raw baby spinach salad at this point! By the time you get your plate and get back to the stove, your shrimp should be done. Shrimp cooks fast... Make sure no shrimp appears clear or blue still. If all appears pink and cooked, it is time to serve!!

5. Take the small sauce pan, and just dump that good shrimp goodness onto your salad! Make sure all the juices from the pan don't go to waste, this is your dressing!
Give that a light tossing.

Optional
6. Take your lemon half, and just give it a little squirt over your salad for some tang. Also add additional black pepper for more of a zest. And there you have it ! My homemade , last minute, thrown together lovely spinach salad!

I did eat the whole thing...minus the one shrimp that didn't make it from the pan to the plate and fell on the floor. Fredo was a happy pup :-p

ENJOY!!!!!

-Justina xoxo

Thursday, December 11, 2008

Bohemian Originals

I just wanted to share with you, the work that I have done on my closet/studio. I use this room to paint, draw, do crafts, sew, write music, apply makeup and do my hair...it is my all purpose room, and I love it ...so I figured I'd design it to my tastes so I have something enjoyable to look at, since I do spend most of my time in this little room....


This is the back wall

n500129910_432619_4434.jpg


Here it is a bit closer up so you can see the detail:

n500129910_432622_5410.jpg

Here is my vanity...it is kinda messy right now :-\....but you can see how I collaged around the mirror. I used the work of Bohemiart, Jill is a good online artist friend of mine on Deviant Art. I love her work very much ! :-D

n500129910_432621_5081.jpg


Thank you to my friend Ross who helped me grid out the diamonds. I painted the whole design in Acrylic paints, and the red in the background is Wall House paint...

Friday, August 31, 2007

Almond Eyes, Lotus Feet

Indian Traditions in Beauty and Health


I was reading an issue of Eye Candy magazine today and I came across this little article that caught my attention. It was about a book which shares homemade recipes and remedies of the Indian culture for beauty and health. I was reading some of the remedies they were giving as examples and I found it rather interesting. As a matter of fact I went to Amazon.com right away to look it up and find out more info about it. Here is the description straight from Amazon.com:

"Almond Eyes, Lotus Feet is a luscious full–color volume that shares the home recipes and remedies of Indian health and beauty–through the voice of an Indian princess sharing secrets with her granddaughter.

A national bestseller in India, this extraordinary book draws on the lives of real figures in royal Indian history, and the ways in which the women of the Indian court found friendship, faith, and love through their beauty traditions. Similar to Like Water for Chocolate, this is both a historical tale and a rich cultural tapestry, filled with ancient remedies, recipes, and tonics used to soften skin, silken hair, and enrich the body like no store–bought product can. Additionally, the book includes health care remedies for women in all stages of life–from puberty to pregnancy to menopause.

In the pages of Almond Eyes, Lotus Feet, readers will discover how to:


•Use almond and saffron to exfoliate the face and body


•Clear troubled skin with papaya and mint


•Create the perfect hair tonic using lemons and coconut oil


•Find fragrances that act as natural aphrodisiacs


•Ease pregnancy through a sandalwood sherbet

Using art and photos from throughout the history of India, this book offers an incredible glimpse into the secrets of timeless beauty. Packed with masks, scrubs, and potions that can be made at home, it is at once a beauty book and a soulful, ancient story of Indian life."


So go pick up a copy!

Can Can Dancers....

Aren't they sexy ?


This is a Can Can themed resturant in Richmond, VA! It looks like a fun visit!


www.cancanbrasserie.com/opening.htm


Check out The Laughing Moon for instructions on how to make your own Can Can Corset
www.lafnmoon.com/saloon_2.htm


Get your doll's crocheted dresses here!


http://www.art-of-craft.co.uk/acatalog/Paradise_Crochet_Patterns.html

Wednesday, August 22, 2007

Gypsy Getaways....


I fell in love with these little Roulottes posted in eclectic gipsyland's flickr account!!! I hope you find them as charming and cozy as I do !!!

Friday, August 17, 2007

Mara Margo Corsets

Mara Margo was founded in 2000 by European designer Madame Margo. Her corsets and designs were inspired by 18th century French culture. She now has showrooms in California, New York, Istanbul, and Moscow. Check out her website for more information!

GET LOVELY MARA MARGO CORSETS HERE!


Wednesday, August 15, 2007

Eclectic Gipsyland on Flickr

such wonderful colorful decor to inspire your inner gypsy!

http://flickr.com/photos/gipsybazar/


Decor Dijour


I found all these lovely pieces here

Some of my favorite Bohemians...


The top row from left to right: Christina Aguilera, Stevie Nicks, Janis Joplin
The bottom row from left to right: The Beatles, Rent the movie, Frida Kahlo, Moulin Rouge, Henri Toulousse Lautrec.

Tuesday, August 14, 2007

Spicy Outdoor Party Space

I got this Project from Debbie Travis's show Painted House on HGTV and I loved the idea so much, that I just HAD to share it with you all


Faux Stained Glass Lanterns

Tools And Materials Needed

Small candle lanterns
Low-tack tape
Scissors
Stained glass paint
Artists' brushes
Imitation lead in paint form

Getting Started
1.Cut a square out of low tack tape and place it in the shape of a diamond in the center of each pane of glass.
2.Using the corners of the tape as dividing points, paint each quadrant of the pane of glass a different stained glass paint colour. Try not to go over it too many times, and paint softly and in single strokes to avoid brush marks.
3.Let dry. Use an X-acto knife to carefully lift the edges of the tape, and remove it from the glass.
4.Draw lines to separate the quadrants of stained glass paint with the imitation lead paint.

Indian Placemats
Tools And Materials Needed
Canvas
Primer
Purple latex paint
Small roller & tray
Henna stencil
Pinking shears
Indelible gold marker
Gold spray paint

Getting Started
1.Cut your pieces of canvas into placemat size - as big or as small as you wish.
2.Prime the canvas on both sides. Let dry.
3.Basecoat with 2 coats of purple latex paint. Let dry. Cut the edges with pinking shears to give a decorative look to the mat.
4.Draw a border around the edge with a gold indelible marker.
5.Spray the Indian Henna hand stencils with gold paint. Make certain that you spray in an open, well-ventilated area, or outside. Spray away from your painted projects so as not to get the paint on your work.
6.Let dry, and then remove the henna hand stencil from its backing and stick the left hand down centered on the left side of the placemat, and the right hand on the right side of the placemat.

Stamped Velvet Cushions
Tools And Materials Needed
Velvet, rayon-acetate or viscose
Craft paper
Pencil and ruler
Straight pins
Rubber stamp
Iron

Getting Started
1.You must use a rubber stamp and the velvet must be made from silk, rayon, rayon acetate, or viscose. It's heat from the iron that makes the impression, and it won't work on nylon, polyester or washable velvets. The effect is marvelous and everyone who sees these cushions can't resist touching them.

2.For this heating printing technique, practice first on a scrap of velvet to get the right touch and heat time. The iron should be set at the wool or cotton setting. Avoid pressing down with the front of the iron as the steam holes will leave an impression. Cut out 2 pieces of velvet an inch bigger than the size of cushion you want.

3.Mark out your design on a piece of brown paper the size of the finished cushion. Lay it on the top of the back of the velvet.

4.Lift up the brown paper and place pins where each design will go.
Heat your iron to the wool or cotton setting. Don't use any steam.

5.Place the stamp image, rubber side up on an ironing board. Remove a pin, lay fabric right side (velvet) down against the rubber image. Press the iron to the fabric and DO NOT move it. Count to twenty and lift up the iron carefully. The image has been impressed onto the velvet. Repeat until you have finished the pattern.

6.There is nothing simpler than sewing up a few accent cushions, and it's a brilliant way to introduce a bit of gorgeous fabric or a bright dash of color into your room. It's just a matter of sewing three straight lines, turning the fabric and stuffing with fiberfill or a pillow form. The opening can either be sewn up by hand, or with Velcro.

View HGTV website HERE